|
Written by Steve Jenkins (webmaster@winfiles.com)
If Client for Microsoft Networks does not appear on the list, then press Add, then Client, then find the Client for Microsoft Networks option. Press OK and it will appear in the Networks dialog box.
Fill in a name for your computer (this is the NetBIOS name). You can call it anything, and it is not case-sensitive. Fill in WORKGROUP for the Workgroup option.
Computers use IP addresses for locating each other. They either have a permanently assigned (static) IP address, or they have a different (dynamic) IP address each time they connect to the network.
WINS and its companion, LMHOSTS, work together to locate remote computers. While WINS will suffice to locate both static and dynamic IP addresses, LMHOSTS is useful for locating static IP addresses that don't use WINS (if your computer cannot locate an IP address using WINS, it will automatically try LMHOSTS).
Regardless of how your computer receives its IP address, you can use a combination of the LMHOSTS and WINS to locate remote computers.
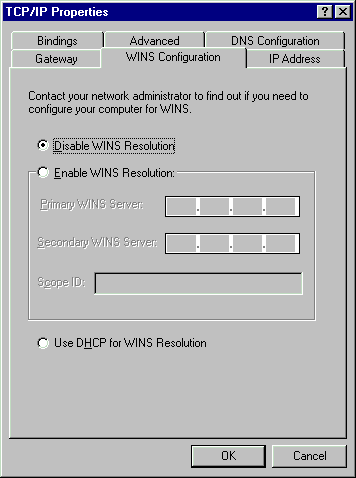
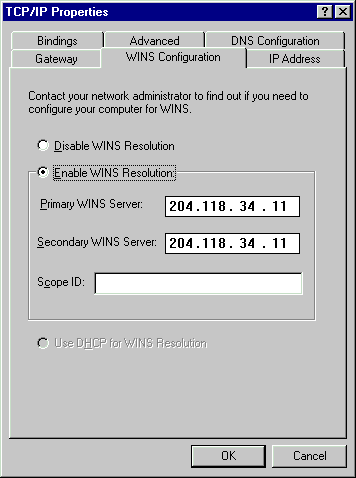
To configureClick on the WINS Configuration tab. It should look like this. Select the Enable WINS Resolution button, and the dialog box will let you enter the IP address(es) of your WINS server(s).
If you don't have a WINS server on your network, or you don't know what a WINS server is, put the number 128.205.1.31 in for the Primary, and use 128.205.250.24 as the Secondary WINS server. Your dialog box should now look something like this.
To configure If you're trying to find your IP address and NetBIOS name for a friend to
put in his/her LMHOSTS file, the easist way is to go to the
Using a text editor, make
a file in your Windows directory called LMHOSTS (with no file
extension). This file contains the IP addresses and NetBIOS name of the
machines you'll want to be able to reach. The format of the file is:IP.Add.re.s.s ComputerName
For example, try putting the following line in your
LMHOSTS file:198.105.232.1 ftp
That is the IP address and NetBIOS name of Microsoft's NT FTP
Server!
![]() menu and Run...
NBTSTAT -N. This will run a DOS window and display your IP address at
the top of the screen (something like 123.123.12.3) and will list your NetBIOS
local name table. Your computer name is the first entry in the table.
menu and Run...
NBTSTAT -N. This will run a DOS window and display your IP address at
the top of the screen (something like 123.123.12.3) and will list your NetBIOS
local name table. Your computer name is the first entry in the table.
If you only know the \\ComputerName, you can still connect. Just
make sure the Network Neighborhood icon is present on your desktop,
press the ![]() button,
then select Run..., and type in the \\ComputerName. You'll get a
dialog box with all the shared resources available on the remote computer. Or,
to just connect to a drive on an NT machine, run the
\\ComputerName\driveletter$. Make sure the dollar sign follows the
drive letter!
button,
then select Run..., and type in the \\ComputerName. You'll get a
dialog box with all the shared resources available on the remote computer. Or,
to just connect to a drive on an NT machine, run the
\\ComputerName\driveletter$. Make sure the dollar sign follows the
drive letter!
If you don't happen to know the names of some shared resources out on the
Net, go to the ![]() menu
and Run... the following:
menu
and Run... the following:
\\winserve.001\guest
This will connect you to Winserve's publicly available
share on the Internet. Try some of these other share names, too:
\\winserve.001\guest\winhq (The WINHQ Public Share)
\\winserve95\guest  	   (Winserve's Experimental Windows 95 shared drive)
\\clyde\infoserver  	   (EMWACS NT Share)
\\discord\public	   (Shared systems site by A. Weintraub)
If you're trying to find your NetBIOS name for a friend to
connect to using WINS, the easist way is to go to the ![]() menu and Run...
NBTSTAT -N. This will run a DOS window and display your IP address at
the top of the screen (something like 123.123.12.3) and will list your NetBIOS
local name table. Your computer name is the first entry in the table.
Note: You CANNOT run your own computer name. You will get an
extended error message.
menu and Run...
NBTSTAT -N. This will run a DOS window and display your IP address at
the top of the screen (something like 123.123.12.3) and will list your NetBIOS
local name table. Your computer name is the first entry in the table.
Note: You CANNOT run your own computer name. You will get an
extended error message.
Press OK and the connection will be made. The drive is now accessible by any DOS or Windows application! To disconnect from the mapped drive, simply choose Disconnect Network Drive when you right-click on My Computer.
Once you've got peer-to-peer connections running, try sharing some of your own stuff! You can share a CD-ROM drive, printer, directory, entire hard drive... just make sure that you protect your sensitive data and only allow full access to people you know and trust!
If you do plan on sharing any of your resources, make sure you password protect them according to the resource's importance and your security needs. You can share and protect any resource from the Sharing... tab of the Properties... dialog box of any printer, drive, folder, etc.
| Back to Top | Advertising Information | Contact Us | About the Site |
Copyright © 2001 CNET,
Inc. All rights reserved.
WinFiles.com is a service of
CNET, Inc. Microsoft and
Windows are registered trademarks of Microsoft Corporation. Microsoft
Corporation in no way endorses or is affiliated with WinFiles.com. The products
referenced in this site are provided by parties other than CNET. CNET makes no
representations regarding either the products or any information about the
products. Any questions, complaints, or claims regarding the products must be
directed to the appropriate manufacturer or vendor. Click here for usage
terms and conditions. For privacy info, please review our privacy policy.